RC522 with Raspberry Pi 2

The RC522 is a cheap RFID module that can read and write Mifare’s tags and being sold at several web stores, like eBay and included with many “starter kits” nowadays. Simply search RFID-RC522 (MF-RC522). The card reader and the tags communicate using a 13.56MHz electromagnetic field. (ISO 14443A standart tags)
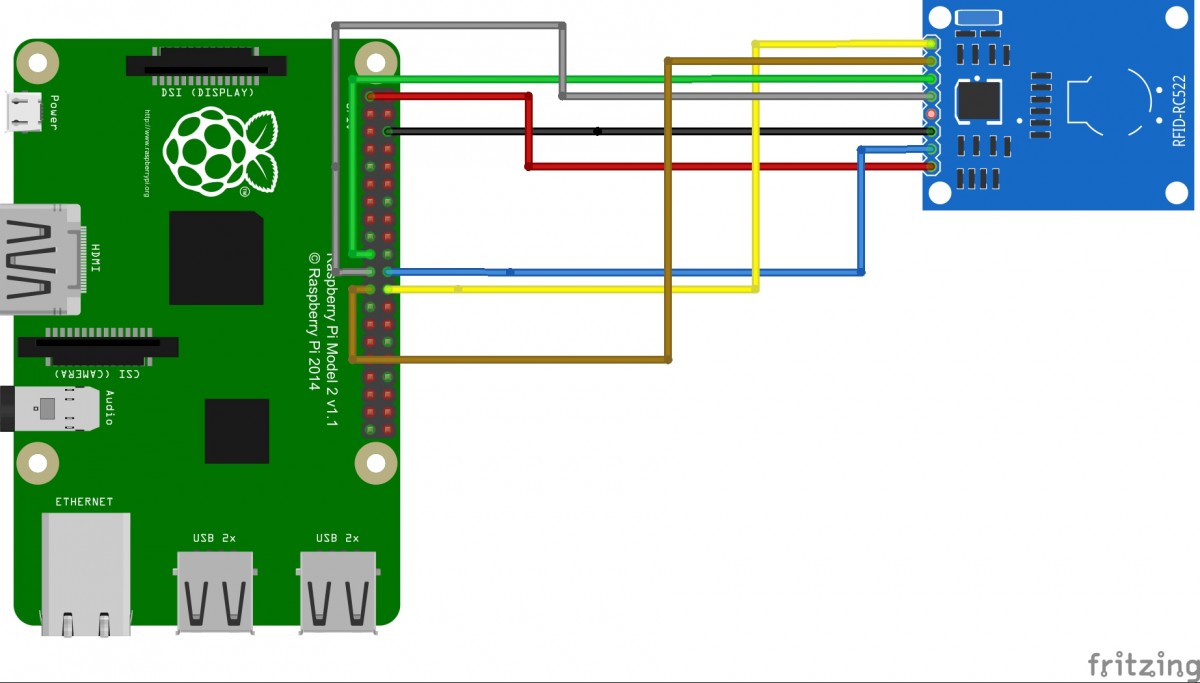
Wiring up:

Below table shows the connection between RC522 and RPi2:

RC522 pin RPi2 pin nr RPi2 pin name
SDA 24 GPIO8
SCK 23 GPIO11
MOSI 19 GPIO10
MISO 21 GPIO9
IRQ Remark: Not connected
GND GND GND
RST 22 GPIO25
3.3V 1 3V3

Please note that the RPi2 has a 40 pin header (RPi1 has 25).

Wiring RPi2 and RC522

RPi2 steps:

We need to enable all the python libraries and the SPI interface on the RPi2 to get it working.

To install the python environment:

sudo apt-get install python-dev

enable spi interface:
Edit the file /boot/config.txt and add the following two lines:

device_tree_param=spi=on
dtoverlay=spi-bcm2708

To check if the SPI interface is working, please reboot the RPi and run the following instructions:

$ dmesg | grep spi

The output will look like:

[ 10.886588] bcm2708_spi 3f204000.spi: master is unqueued, this is deprecated
[ 10.901487] bcm2708_spi 3f204000.spi: SPI Controller at 0x3f204000 (irq 80)

Now download and install the SPI python library:

git clone https://github.com/lthiery/SPI-Py.git
$ cd SPI-Py
$ sudo python setup.py install

Now download and run the RC522 lib:

$ git clone https://github.com/rasplay/MFRC522-python.git
$ cd MFRC522-python
$ python read.py

The output will look like:

Card detected
Card read UID: 98,40,242,197,125

Turn your Raspberry PI into a malicious network traffic scanner with wireshark

I needed to scan a network with wireshark to check for malicious traffic. I took my RPi turned into a router with a DHCP server and installed wireshark to check all the network traffic.

Step 1: Static IP address

See my previous article for the setup.

Step 2: Install and configure DHCP server

In this case I’ve chosen the ISC as DHCP server. To install:

sudo apt-get install isc-dhcp-server

For the configuration, please edit /etc/dhcp/dhcpd.conf and add the following:

subnet 192.168.100.0 netmask 255.255.255.0 {
range 192.168.100.20 192.168.100.39;
option broadcast-address 192.168.100.255;
option routers 192.168.100.1; option domain-name-servers 8.8.8.8;
}

Now we need to tell the daemon some specifics, please edit /etc/default/isc-dhcp-server and uncomment the following:

DHCPD_CONF=/etc/dhcp/dhcpd.conf
DHCPD_PID=/var/run/dhcpd.pid
INTERFACES="eth0"

And add “eth0” to the interfaces list, this tells the daemon on which interface he needs to react on.

Before you run the DHCP server please stop the DHCP server on your rputer. Now you can start the daemon on your RPi with: sudo service isc-dhcp-server start

If you run into any problems please use systemctl status isc-dhcp-server.service to check the output.

You can use cat /var/lib/dhcp/dhcpd.leases to check out the leases.

Step 3: Turn your RPi into a router

Your RPi is now able to respond to DHCP requests, but now we need to be able to forward the traffic.

sudo bash -c 'echo 1 > /proc/sys/net/ipv4/ip_forward'

Please edit /etc/sysctl.conf and uncomment out the line that says net.ipv4.ip_forward = 1
Last step is to enable NATTING via IPtables:

sudo iptables -t nat -A POSTROUTING -o eth0 -j MASQUERADE

Excellent, your RPi is now a router in your network and forwarding the traffic.

Step 4: Wireshark
I want to see all network traffic and for this purpose I installed wireshark. The RPi2 is fast enough to use the GUI of wireshark. For this purpose I installed tightvncserver and wireshark.

sudo apt-get install tightvncserver
sudo apt-get install wireshark

Now with a VNC client you can connect to your RPi and start wireshark in a terminal. You can use not (port 5901) as capture filter which does not capture the VNC traffic.

wireshark capture