Start nodejs script during bootup on your RPi

If you have written a nodejs script you want to be able to run this application as a daemon on your linux system. For this purpose you could use Forever. The purpose of Forever is to keep a child process (such as your node.js web server) running continuously and automatically restart it when it exits unexpectedly. In this article you can find how to install forever and launch a nodejs script in init.d.

Installation

sudo npm -g install forever

Command Line Usage
You can use forever to run scripts continuously (whether it is written in node.js or not).
Start:

forever start server.js
Output:
warn:    --minUptime not set. Defaulting to: 1000ms
warn:    --spinSleepTime not set. Your script will exit if it does not stay up for at least 1000ms
info:    Forever processing file: server.js

Stop:

forever stop server.js
Output:
info:    Forever stopped process:
    uid  command             script    forever pid   id logfile                 uptime
[0] MKqv /usr/local/bin/node server.js 19915   19920    /root/.forever/MKqv.log 0:0:1:14.969

Start script during boot
To start your script during boot on your raspbian you will need to create a script in /etc/init.d. In this example I will use a script called nodestart to which you can provide two arguments “start” and “stop”. The nodejs script is called “server.js”.

#!/bin/sh
#/etc/init.d/nodestart

export PATH=$PATH:/usr/local/bin
export NODE_PATH=$NODE_PATH:/usr/local/lib/node_modules

case "$1" in
  start)
  exec forever --sourceDir=/[directory to your script] -p /[log directory] server.js
  ;;
stop)
  exec forever stopall
  ;;
*)
  echo "Usage: /etc/init.d/nodeup {start|stop}"
  exit 1
  ;;
esac

exit 0

Your almost there! Make the script executable and install it:

chmod 755 /etc/init.d/nodestart
update-rc.d nodeup defaults

Now it will be automatically started during boot or you can try it via the CLI:

/etc/init.d/nodestart start

You can remove the script via:

update-rc.d -f nodestart remove
Install nodejs on RPi2

Unfortunately nodejs is no longer maintained via an installation of apt-get install on the raspberry PI. Please use below instructions for the installation.

Be sure that you first remove the old one:

sudo apt-get remove nodejs

Then check on the nodejs site the latest version: https://nodejs.org/dist/latest/
In my case it is: node-v6.0.0-linux-armv7l.tar.gz

For the RPi1 use should use armv6l.tar.gz

Now it’s time to download and install.

wget https://nodejs.org/dist/latest/node-v6.0.0-linux-armv7l.tar.gz
tar -xvf node-v6.0.0-linux-armv7l.tar.gz 
cd node-v6.0.0-linux-armv7l
sudo cp -R * /usr/local/

Your done! Now check that it is working by node -v

RC522 with Raspberry Pi 2

The RC522 is a cheap RFID module that can read and write Mifare’s tags and being sold at several web stores, like eBay and included with many “starter kits” nowadays. Simply search RFID-RC522 (MF-RC522). The card reader and the tags communicate using a 13.56MHz electromagnetic field. (ISO 14443A standart tags)

Wiring up:

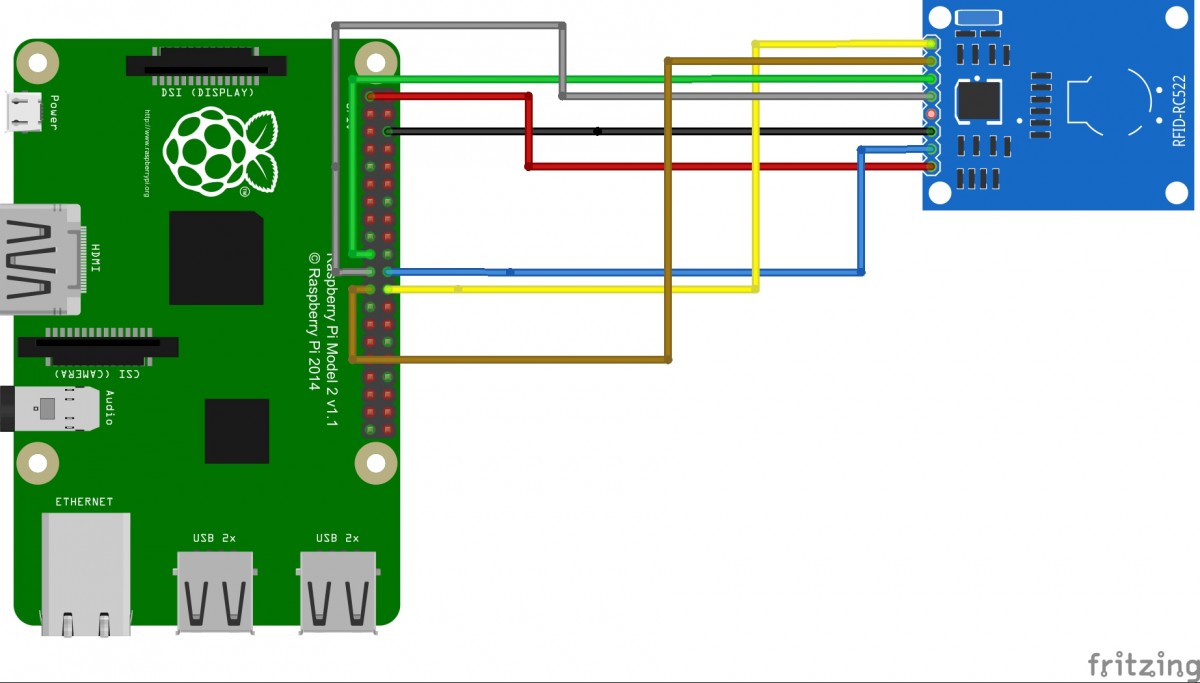
Below table shows the connection between RC522 and RPi2:

RC522 pin RPi2 pin nr RPi2 pin name
SDA 24 GPIO8
SCK 23 GPIO11
MOSI 19 GPIO10
MISO 21 GPIO9
IRQ Remark: Not connected
GND GND GND
RST 22 GPIO25
3.3V 1 3V3

Please note that the RPi2 has a 40 pin header (RPi1 has 25).

Wiring RPi2 and RC522

RPi2 steps:

We need to enable all the python libraries and the SPI interface on the RPi2 to get it working.

To install the python environment:

sudo apt-get install python-dev

enable spi interface:
Edit the file /boot/config.txt and add the following two lines:

device_tree_param=spi=on
dtoverlay=spi-bcm2708

To check if the SPI interface is working, please reboot the RPi and run the following instructions:

$ dmesg | grep spi

The output will look like:

[ 10.886588] bcm2708_spi 3f204000.spi: master is unqueued, this is deprecated
[ 10.901487] bcm2708_spi 3f204000.spi: SPI Controller at 0x3f204000 (irq 80)

Now download and install the SPI python library:

git clone https://github.com/lthiery/SPI-Py.git
$ cd SPI-Py
$ sudo python setup.py install

Now download and run the RC522 lib:

$ git clone https://github.com/rasplay/MFRC522-python.git
$ cd MFRC522-python
$ python read.py

The output will look like:

Card detected
Card read UID: 98,40,242,197,125