You can connect the RPI and Arduino is several ways, eg. Serial/UART, I2C or USB. With I2C you can connect several device on the same wire. 1:1 communication is now suffiecient so I will go for the Serial/UART connection.
The RPI operates at 3.3V and the arduino I have chosen on 5V. Therefor we should use a Logic Level Converter (LLC) for serial/UART communication. If you are going for I2C please use the I2C converter.
Wiring
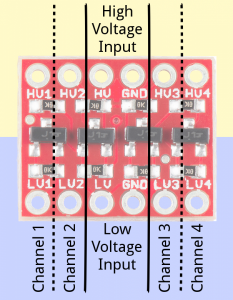
There are 12 total pins on the LLC – two parallel rows of six headers. One row contains all of the high voltage (e.g. 5V) inputs and outputs, the other row has all things low voltage (e.g. 3.3V).
The voltage supplied to the HV and GND inputs should be higher than that supplied to the LV side. For example, if you’re interfacing from 5V to 3.3V, the voltage on the HV pin should be 5V, and the voltage on LV sould be 3.3V.
There are four separate data channels on the BD-LLC, each capable of shifting data to and from high and low voltages. These pins are labeled HV1, LV1, HV2, LV2, HV3, LV3, HV4, and LV4. The number at the end of each label designates the channel of the pin, and the HV or LV prefix determines whether it’s on the high or low side of the channel.
A low-voltage signal sent in to LV1, for example, will be shifted up to the higher voltage and sent out HV1. Something sent in HV3 will be shifted down and sent out of LV3. Use as many of these channels as your project requires.
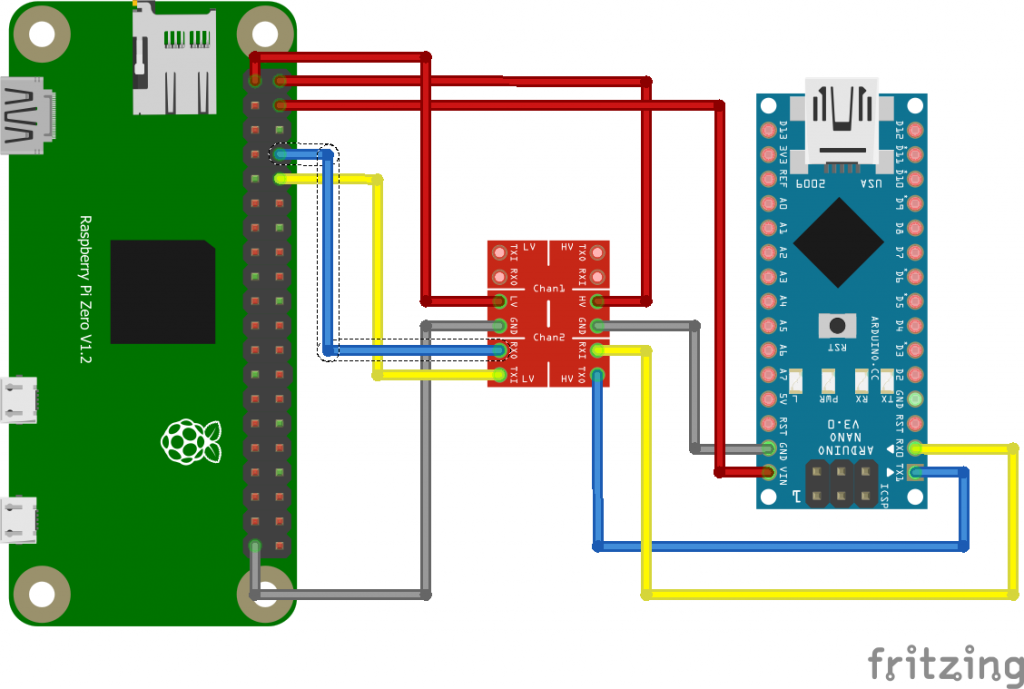
 The RPI is the low level side and the Arduino on the high level side. Please note that for the GPIO the RPI uses 3.3V, but still it has pins to provide 5V. I use the RPI 5V pins to provide power to the Arduino Nano board. We can also use the other RPI 5V pin to provide the HV side for the Arduino. We also need to twist the TX/RX, check this cross on the LLC board (blue/yellow crossing).
RPI config
The RPI is not yet configured to use the serial for communication. Please perform the following steps:
You can use “raspi-config” utility to enable the UART:
1. sudo raspi-config
2. Under “Interfacing Options”, choose “Serial”.
3. Say “No” when it asks if you want a login shell over serial.
4. Say “Yes” when asked if you want the hardware enabled.
5. Finish, then accept the offer to reboot.
After this configuration change and the wiring you are ready to check if the serial communication is ready to use. First you can check if ttyS0 is available on the RPI side with the command ls -l /dev/ttyS0, you should see the following output: crw-rw—- 1 root dialout 4, 64 Mar 22 19:16 /dev/ttyS0
The fastest way to check the communication is to load the following program into your arduino:
int x = 0; // variable

void setup() {
Serial.begin(9600); // open the serial port at 9600 bps:
}

void loop() {
// print labels
Serial.print("NO FORMAT"); // prints a label
Serial.print("\t"); // prints a tab

Serial.print("DEC");
Serial.print("\t");

Serial.print("HEX");
Serial.print("\t");

Serial.print("OCT");
Serial.print("\t");

Serial.print("BIN");
Serial.print("\t");

for(x=0; x< 64; x++){ // only part of the ASCII chart, change to suit

// print it out in many formats:
Serial.print(x); // print as an ASCII-encoded decimal - same as "DEC"
Serial.print("\t"); // prints a tab

Serial.print(x, DEC); // print as an ASCII-encoded decimal
Serial.print("\t"); // prints a tab

Serial.print(x, HEX); // print as an ASCII-encoded hexadecimal
Serial.print("\t"); // prints a tab

Serial.print(x, OCT); // print as an ASCII-encoded octal
Serial.print("\t"); // prints a tab

Serial.println(x, BIN); // print as an ASCII-encoded binary
// then adds the carriage return with "println"
delay(200); // delay 200 milliseconds
}
Serial.println(""); // prints another carriage return
}
This arduino program will print out a list of dec, hex and binair numbers on the serial interface of the arduino.
Now enable the RPI side with:
sudo apt-get install minicom

sudo minicom -b 9600 -o -D /dev/ttyS0
To exit minicom: Hit enter, then ctrl-a then q then press “enter”

One thought on “Serial UART connection RPI zero / Arduino”