Both the Linkit 7688 and DHT22 are low cost components and can perfectly be used as a IOT temperature and humidity device. Using the openwrt part of the linkit to upload all the data to your server.
DHT22 specs:
- 3 to 5V power and I/O
- 2.5mA max current use during conversion (while requesting data)
- Good for 0-100% humidity readings with 2-5% accuracy
- Good for -40 to 125°C temperature readings ±0.5°C accuracy
- Body size 15.1mm x 25mm x 7.7mm
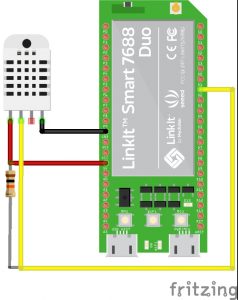
The DHT22 has has four pins
- VCC (3 to 5V power)
- Data out
- Not connected
- Ground
You can ignore pin 3, its not used. Please use a pull-up resistor between VCC and the data pin (10k).
Below pictures shows the connection diagram.
Now we need to install the DHT library. You can find the latest libraries here: https://github.com/adafruit/DHT-sensor-library
Or download from my website: DHT-sensor-library-master
You can use the following sourcecode written by layada. If you download the libraries you can also get the code from the example menu.
// Example testing sketch for various DHT humidity/temperature sensors
// Written by ladyada, public domain

#include "DHT.h"

#define DHTPIN 2 // what digital pin we're connected to

// Uncomment whatever type you're using!
//#define DHTTYPE DHT11 // DHT 11
#define DHTTYPE DHT22 // DHT 22 (AM2302), AM2321
//#define DHTTYPE DHT21 // DHT 21 (AM2301)

// Connect pin 1 (on the left) of the sensor to +5V
// NOTE: If using a board with 3.3V logic like an Arduino Due connect pin 1
// to 3.3V instead of 5V!
// Connect pin 2 of the sensor to whatever your DHTPIN is
// Connect pin 4 (on the right) of the sensor to GROUND
// Connect a 10K resistor from pin 2 (data) to pin 1 (power) of the sensor

// Initialize DHT sensor.
// Note that older versions of this library took an optional third parameter to
// tweak the timings for faster processors. This parameter is no longer needed
// as the current DHT reading algorithm adjusts itself to work on faster procs.
DHT dht(DHTPIN, DHTTYPE);

void setup() {
Serial.begin(9600);
Serial.println("DHTxx test!");

dht.begin();
}

void loop() {
// Wait a few seconds between measurements.
delay(2000);

// Reading temperature or humidity takes about 250 milliseconds!
// Sensor readings may also be up to 2 seconds 'old' (its a very slow sensor)
float h = dht.readHumidity();
// Read temperature as Celsius (the default)
float t = dht.readTemperature();
// Read temperature as Fahrenheit (isFahrenheit = true)
float f = dht.readTemperature(true);

// Check if any reads failed and exit early (to try again).
if (isnan(h) || isnan(t) || isnan(f)) {
Serial.println("Failed to read from DHT sensor!");
return;
}

// Compute heat index in Fahrenheit (the default)
float hif = dht.computeHeatIndex(f, h);
// Compute heat index in Celsius (isFahreheit = false)
float hic = dht.computeHeatIndex(t, h, false);

Serial.print("Humidity: ");
Serial.print(h);
Serial.print(" %\t");
Serial.print("Temperature: ");
Serial.print(t);
Serial.print(" *C ");
Serial.print(f);
Serial.print(" *F\t");
Serial.print("Heat index: ");
Serial.print(hic);
Serial.print(" *C ");
Serial.print(hif);
Serial.println(" *F");
}
With the arduino ide 1.6.9 you will receive a compile error “magic key not defined”. You can download and use the hourly builds to solve this issue.
The serial output will look like this:
Humidity: 49.40 % Temperature: 25.00 *C 77.00 *F Heat index: 24.85 *C 76.72 *F
Humidity: 49.40 % Temperature: 25.00 *C 77.00 *F Heat index: 24.85 *C 76.72 *F
Humidity: 49.40 % Temperature: 25.00 *C 77.00 *F Heat index: 24.85 *C 76.72 *F
Humidity: 49.40 % Temperature: 24.90 *C 76.82 *F Heat index: 24.74 *C 76.52 *F
Humidity: 49.40 % Temperature: 25.00 *C 77.00 *F Heat index: 24.85 *C 76.72 *F
The fritzing parts you can download here:
LinkIt_Smart_7688_Duo_DHT22_diagrams